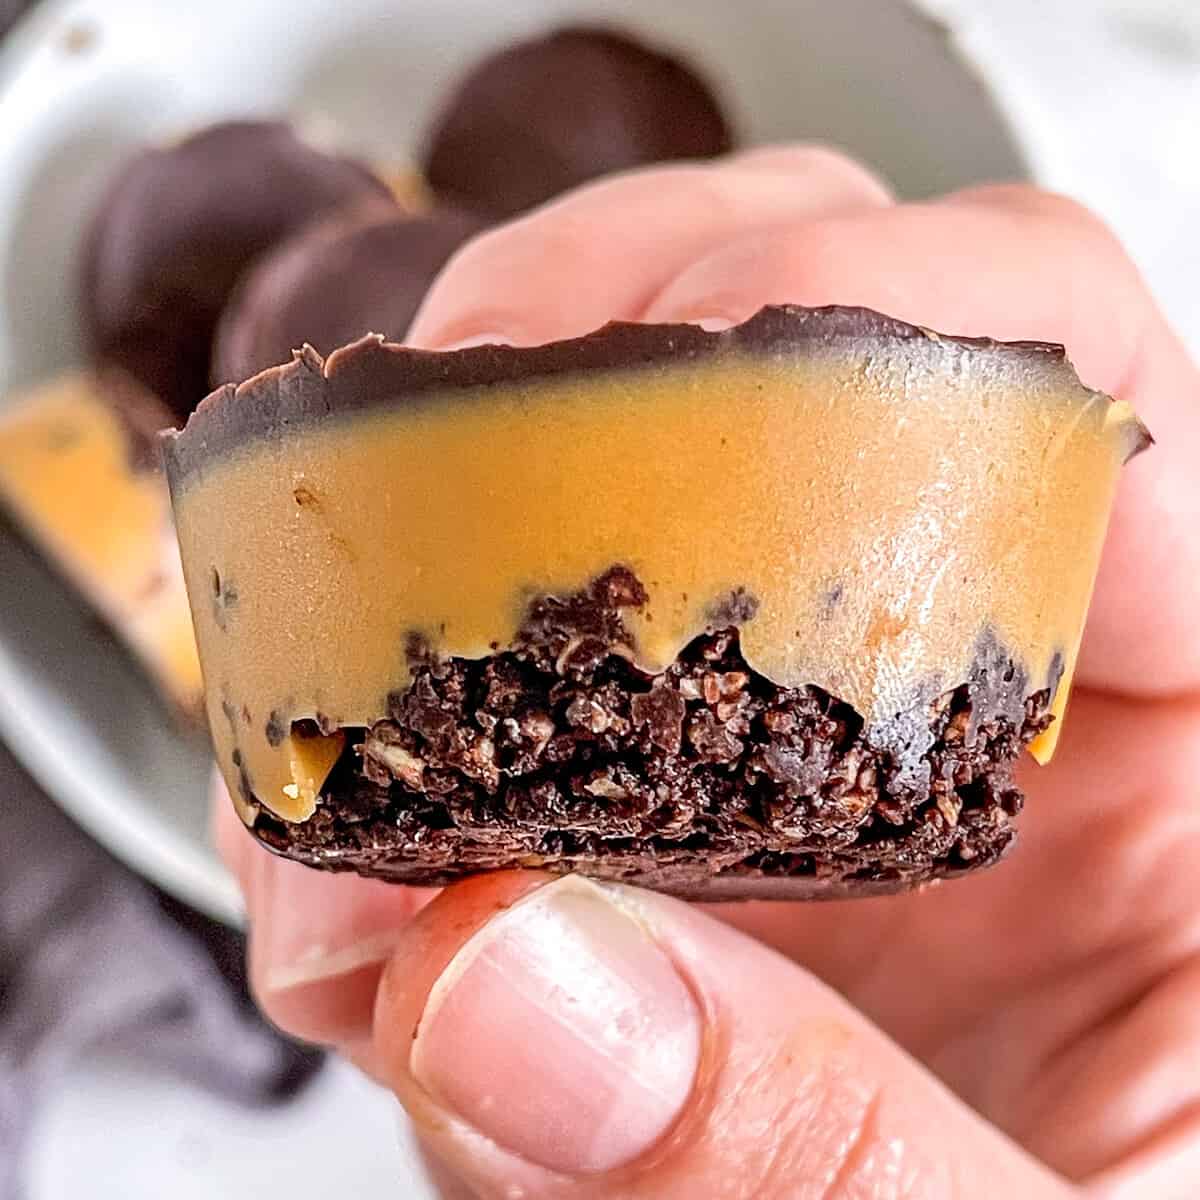
Biscoff Tiffin
This biscoff tiffin will blow your mind. A symphony of dark chocolate, Biscoff biscuits, creamy spread, and white chocolate chunks come together to create a treat that's as irresistible as it is easy to make.
This mouth-watering recipe is a twist on my classic tiffin recipe (which is equally delicious), simply adding in biscoff spread for extra flavour.
I've made no secret of being somewhat obsessed with biscoff-flavoured treats on this blog. One of my most popular recipes to date is my vegan biscoff brownies recipe - but my biscoff cheesecake and biscoff flapjacks are close behind!

Why You'll Love This Recipe:
- Offers a delicious blend of rich dark chocolate, crunchy Biscoff biscuits, and velvety Biscoff spread for a truly indulgent experience.
- The addition of white chocolate chunks and raisins or cherries provides a delightful burst of sweetness and texture.
- Perfect for satisfying your sweet cravings or impressing guests with a unique and mouthwatering dessert.
- Requires minimal effort and no baking, making it an ideal treat to whip up anytime.
- Can be customized with additional toppings or mix-ins like nuts or dried fruits for your own creative twist.
Ingredients for Biscoff Tiffin
Scroll down to the recipe card at the bottom of this page for the full instructions and quantities!
- Dark chocolate
- Lotus Biscoff spread
- Biscoff biscuits
- Raisins or cherries
- White chocolate, chopped into chunks
- Dark chocolate, for topping
- Biscoff spread, for topping
What You'll Need:
- Microwave-safe bowl
- Lined baking tray (7 x 7 inches)
- Spoon for mixing and smoothing
- Optional: Reserved Biscoff biscuit chunks for topping

Instructions
Again, head down to the recipe card for the full instructions along with the ingredients you'll need to re-create this recipe yourself.
Step 1: Melt and Mix
Melt the dark chocolate in a microwave-safe bowl using short bursts. Once almost melted, add the Lotus Biscoff spread and return it to the microwave for another 30 seconds until fully melted. Stir the mixture until the dark chocolate and Biscoff spread are well combined.
Step 2: Prepare the Base
Chop the Biscoff biscuits into small chunks. Add the biscuit chunks, raisins or cherries, and white chocolate chunks to the dark chocolate mixture. Stir thoroughly until all the ingredients are fully coated and combined.
Step 3: Set in Tray
Pour the mixture into a lined baking tray (7 x 7 inches) and press it down firmly to create an even layer. This will be the base of your Biscoff Chocolate Tiffin.
Step 4: Chill
Place the tray in the refrigerator and let the mixture chill for at least 1 hour. This allows the flavors to meld and the tiffin to set.
Step 5: Create the Topping
Melt the remaining 200g of dark chocolate for the topping. Pour it over the chilled tiffin, using a spoon to smooth it down evenly.

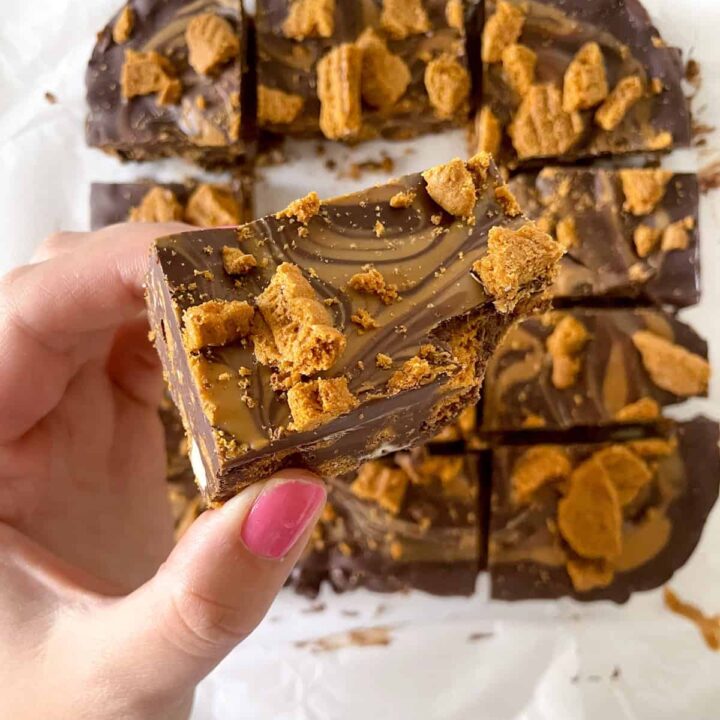
Step 6: Add the Biscoff Swirl
Melt the 50g of Biscoff spread in the microwave for about 30 seconds. Drizzle the melted spread over the dark chocolate topping. Use a spoon to gently swirl the Biscoff spread into the chocolate to create an appealing pattern.
Step 7: Final Touches and Serving
Optionally, sprinkle reserved Biscoff biscuit chunks over the top for an extra crunch. Refrigerate the tiffin for another hour, or preferably overnight, to allow it to fully set.
Step 8: Enjoy! Once set, remove the tiffin from the tray and chop it into delectable chunks. Keep the Biscoff Chocolate Tiffin refrigerated until serving, taking it out about 30 minutes before indulging in its irresistible flavors.
Expert Tip: Experiment with additional toppings such as chopped nuts, shredded coconut, or dried cranberries for added variety and flavor.
Other Recipes You Might Like:
- Chocolate Biscoff Bites (Vegan + No-Bake)
- Vegan Biscoff Cake
- Easy Apple Flapjacks
- Chocolate Twist Recipe
FAQs:
Q: Can I use different types of chocolate?
A: Certainly! You can use milk or semi-sweet chocolate if you prefer a milder flavor profile.
Q: Can I skip the white chocolate or replace it with other ingredients?
A: Absolutely! Feel free to customize the mix-ins to your liking. Chopped nuts, dried fruits, or even mini marshmallows can be fantastic alternatives.
Q: How long can I store the Biscoff Chocolate Tiffin?
A: Keep the tiffin refrigerated in an airtight container for up to a week. However, its delightful taste and texture are best enjoyed within the first few days.
Whether you're treating yourself or sharing with loved ones, this recipe promises a delightful journey into dessert bliss.
Biscoff Tiffin
Insanely delicious lotus biscoff tiffin bars! This no-bake biscoff recipe will blow you away - and I wouldn't blame you if you don't want to share!
Ingredients
- 200g dark chocolate
- 100g lotus biscoff spread
- 125g biscoff biscuits
- 30g raisins or cherries
- 30g white chocolate, chopped into chunks
- 200g dark chocolate, to top
- 50g biscoff spread, to top
Instructions
- Melt the dark chocolate in a microwave-safe bowl in short bursts.
- Once it's almost melted, add the biscoff spread and place it back in the microwave for another 30 seconds until fully melted. Stir to combine.
- Chopped your biscoff biscuits into small chunks, then add the biscuits, raisins, and white chocolate chunks to the dark chocolate mixture and stir thoroughly until fully combined.
- Pour the mixture into a lined baking tray ( 7 x 7 inches) and press down firmly.
- Refrigerate for 1 hour.
- Melt the dark chocolate topping and pour it over the tiffin, using a spoon to smooth it down.
- Melt the biscoff spread (30 seconds( and drizzle it over the dark chocolate. Use a spoon to gently swirl the spread into the chocolate to create a nice pattern.
- Optionally, sprinkle some reserved biscoff biscuit chunks over the top.
- Refrigerate for another 1 hour minimum, or preferably overnight.
- Chop into chunks and serve! Keep refrigerated until serving, removing from the fridge about 30 minutes before serving.
Recommended Products
As an Amazon Associate and member of other affiliate programs, I earn from qualifying purchases.